• About Me

lifeisdelish

lifeisdelish

Category Archives: recipes

Lamb Chops rubbed with mint and spices

28 Monday Jan 2013

Posted by sue-ann in recipes

≈ Leave a comment

Tags

couscous, lamb chops

lamb chops (wm)

It still amazes me that it’s the new year.  In the last 3 months, I’ve been occupied with training our new helper (housekeeper/cook), a very disruptive period of construction rectification work at home, the school holidays, a short birthday getaway with the family to Thailand, my first mission trip to Cambodia with some kids from church, year-end work at the office, Christmas preparations, cooking and celebrations, and then preparations for the new school year. We’re just starting to resume a more normal routine, with the kids’ new schedules finally in place, and I’m just starting on a renewed exercise regime, with my first half marathon for this year lined up for end March.  And then it just hit me yesterday that Chinese New Year is only 2 weeks away!

It’s usual for me to do some reflection at the end of every year, but this time round, I felt there wasn’t anything meaningful I had to say about the past year, nor were there any insights about myself or life in general which were worth sharing or even thinking about. Much of this had to do with a spiritual emptiness I’d been experiencing for awhile, stemming either from doing generally too much (or perhaps too little of any real significance), but mostly from failing to take time to spend in quiet reflection and meditation on a more regular basis.  So I’ve resolved that it shall be different this year.

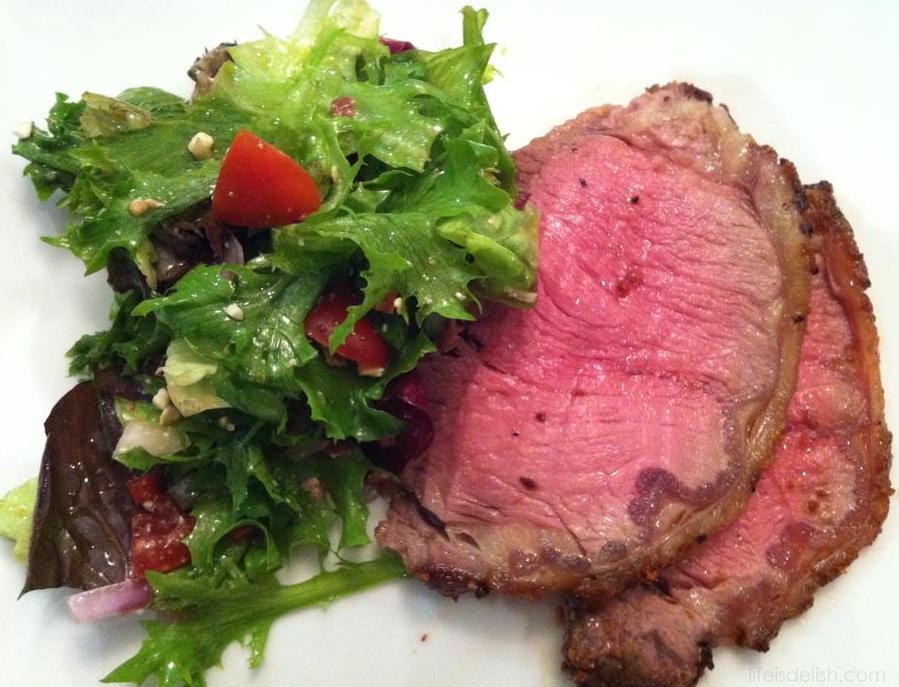
Anyway, over the weekend, we had the enviable task of clearing out the freezer of the last of the lamb racks from our Christmas stash.  I cut it up into lamb chops, trimmed off all but a very thin sliver of fat, covered the chops with a mixture of chopped garlic (2-3 tbs), dried mint leaves (1tsp), ground cumin (2 tsp), ground turmeric (1 tsp) and salt (1 tsp), let it stand for about an hour, then arranged them on a cast iron grillpan, which was then placed on the top rack of the oven to grill until cooked to medium (about 12-15 minutes).  Easy and yummy.  In fact, I couldn’t believe how easy it was, particularly because there wasn’t much cleaning up to do.  If you’ve ever had to clean up your kitchen after cooking on a grillpan over the stove, you’ll probably know what I mean.

We had the lamb chops with saffron-spiced couscous.  I’d sauteed some chopped garlic (2 tbs) and sliced shallots (3 tbs) in olive oil in a pan until softened, added some ground turmeric and ground cumin, and mixed it with the garlic and shallots and continued to saute for awhile.  Then I added into the pan 3/4 cups water in which I’d soaked a pinch of saffron threads, and brought the pan to a boil.  I then added 3/4 cups couscous and some salt, stirred with a fork, covered the pan and turned off the heat.  In the meantime, I toasted some pinenuts in the oven-toaster (about 5 minutes).  Then I turned on the heat on the stove back on to low, fluffed the couscous with a fork, added some softened butter (about 1 tbs or so), and salt to taste before turning off the heat.  Finally I tossed some chopped coriander and the toasted pinenuts before serving.

Well, if you ever try this out, I hope it works for you as well as it did for us.  I consider this a fuss-free lamb chop recipe, because it entails so little preparation, and doesn’t stink up your whole kitchen. And that is always a good thing.  Have a good week!

“As Jesus and his disciples were on their way, he came to a village where a woman named Martha opened her home to him. She had a sister called Mary, who sat at the Lord’s feet listening to what he said. But Martha was distracted by all the preparations that had to be made. She came to him and asked, “Lord, don’t you care that my sister has left me to do the work by myself? Tell her to help me!”

“Martha, Martha,” the Lord answered, “you are worried and upset about many things, but few things are needed—or indeed only one. Mary has chosen what is better, and it will not be taken away from her.”  – Luke 10:38-42

Advertisement

Share this:

  • Facebook
  • Twitter
  • More
  • Tumblr
  • Pinterest
  • LinkedIn
  • Reddit
  • Email

Like this:

Like Loading...

Black Pepper Garlic Striploin Roast, and hello!

28 Monday Jan 2013

Posted by sue-ann in recipes

≈ Leave a comment

Tags

roast beef, striploin

Black Pepper and Garlic Striploin Roast.  Nice, charred and smokey. So yummy. Coated in a mixture of minced garlic and coarsely-ground black pepper, and roasted in the oven at 235C for 50 mins for a perfect medium rare in the middle and medium at the ends.

Black Pepper and Garlic Striploin Roast. Nice, charred and smokey. So yummy. Coated in a mixture of minced garlic and coarsely-ground black pepper, and roasted in the oven at 235C for 50 mins for a perfect medium rare in the middle and medium at the ends.

Hello! Although I haven’t been blogging here much, I’ve continued to regularly share pictures from my kitchen on my facebook page, Life is Delish by tsa.  Like the one in this post, which was from one of the Christmas dinners we hosted.

Here is where I make the longer posts and share recipes (when I have time to sit down in front of the computer!), otherwise, I’m usually just posting on my facebook page.  That’s actually where this blog originated – I started this blog because friends who liked my food pictures on facebook were often requesting that I share my recipes, so I decided to blog them.

Anyway, check out my facebook page if you’d like to see what I’ve been cooking since Christmas!  I’d love to see you there. 🙂

Share this:

  • Facebook
  • Twitter
  • More
  • Tumblr
  • Pinterest
  • LinkedIn
  • Reddit
  • Email

Like this:

Like Loading...

Deliciously Easy Yet Healthy: Chicken Casserole with Chopped Vegetables

24 Wednesday Oct 2012

Posted by sue-ann in recipes

≈ 2 Comments

Tags

Chicken Casserole, quick and easy

(Edited on 7 November 2012.  Revisions italicized).

I enjoy cooking for many reasons.  One of them is that at times, it’s almost a form of escape, and it helps keep me relaxed and balanced.  During those times,  I am focused completely on preparing the meal, and when it’s done and the meal  has been enjoyed, I feel refreshed, almost energized.

This was tonight’s dinner, and what a delicious, hearty and healthy meal it was! So easy to make too, thanks to that dutch oven which I’m appreciating more and more.  We had this Chicken Casserole with quinoa, which I discovered today that I really enjoy.  No wonder it seemed to be everywhere in the US – quinoa, that is.

Anyway, to make this, first chop up whatever sweet vegetables you like (the juicier the vegetables the better) into bite sizes.  (I used 2 potatoes, 2 carrots, 2 onions, 3 stalks celery and even threw in 2 apples.  I will try it with corn kernel next time).  Then cut up a whole chicken into 6 parts, pat dry with paper towel and rub with 2 tsp salt and 1/2 tsp sugar.

Now put some olive oil into a casserole over a stove and saute a garlic (separated into segments with last layer of skin on) and the onions, then the chicken, until chicken is browned.  Remove chicken from casserole.

Chuck all other vegetables into the casserole, toss in some chopped Italian parsley or thyme (or both) and allow to stand on low heat on stovetop for a couple of minutes.  Some moisture from the vegetables should have collected at the bottom of the casserole.  Then arrange chicken back on top, skin side up. Cover casserole and put in preheated oven at 160C 150C for 2.5 hours (during which time you can do a whole host of other things!) What is produced is juicy, tender, flavourful chicken, and its drippings and the moisture from the veggies make a wonderful broth even though no water was added at all.  Sprinkle salt and pepper over and serve.

Share this:

  • Facebook
  • Twitter
  • More
  • Tumblr
  • Pinterest
  • LinkedIn
  • Reddit
  • Email

Like this:

Like Loading...

Eating Healthier: Asian-flavoured Grilled Chicken with Brown Rice and Salad

22 Monday Oct 2012

Posted by sue-ann in recipes

≈ Leave a comment

Tags

Asian salad, brown rice, grilled chicken

As part of an effort to include healthier meals into our home menu, I made an Asian-flavoured Grilled Chicken with Brown Rice and Salad for dinner over the weekend.

We don’t usually eat brown rice at home, but I’m hoping to introduce some complex carbohydrates and grain into our regular diet.  Brown rice is rice with only the hull removed (as opposed to white rice, which has hull and all its nutrients removed in the refinement process).  Brown rice contains vitamins, minerals and fibre, is cholesterol-free, low in calories, is a good source of energy and helps in fat-burning.

How did I get them to eat it? Of course I cheated. The rice was cooked in home-made chicken stock with garlic and ginger, to ensure it went down well with everyone.  And it worked so well that I was told it would be alright if we converted to brown rice for good!

For the grilled chicken, I used chicken fillets which were marinated with bashed garlic, sliced red onion, sliced ginger and (just because I happened to have 2 stalks of lemon grass in my fridge) 2 stalks of lemon grass chopped (tender white parts only). Just a little salt was added, then it was left to marinade for a bit before grilling/ pan-frying with a minimal amount of olive oil on low-medium heat till just cooked through, so it remained tender and juicy.

What I was particularly proud of about this meal was the salad. Or the salad dressing, to be exact.  It was a zesty home-made dressing I’d originally come up with some time back to make an Asian-flavoured chicken salad.  Its flavour is very similar to that of the yu sheng (raw fish tossed in a vegetable salad) we get from rice porridge (chok) stalls at hawker centres.

What goes into the salad dressing is approximately 1 tbs sliced shallots (or substitute with chopped red onion, although not ideal), 2 tbs finely-minced ginger, some chopped spring onion, 1.5 tbs of sesame oil, 1.5 tbs light soya sauce, half a chilli sliced, and the juice of 2-3 medium-sized limes (add more if preferred), all whisked together till well-blended. Do adjust the quantities of the ingredients shown here to taste, as they are rough approximates. Tossed with mixed salad leaves, sliced cucumbers and cherry tomatoes, this makes a very refreshing salad, especially when eaten chilled.

Share this:

  • Facebook
  • Twitter
  • More
  • Tumblr
  • Pinterest
  • LinkedIn
  • Reddit
  • Email

Like this:

Like Loading...

Fried Rice the Way I Like It

22 Monday Oct 2012

Posted by sue-ann in recipes

≈ Leave a comment

Tags

Chinese, Fried Rice, one-dish meals, quick and easy

It’s the rainy season again, which means hot humid afternoons followed by thunderstorms in the evenings and early mornings.  But today, I’m secretly (or not so secretly) pleased that the dark clouds have given me an excuse not to go out for a run. Because I’ve neglected blogging for long enough, and I do miss it.

I mentioned we were getting a new housekeeper/cook.  Now, I miss the luxury of having things in the kitchen done with minimal supervision, but I’m not complaining, since it’s all part and parcel of training someone new.

Today I just wanted a simple one-dish meal, so I took the opportunity to demonstrate how I like Fried Rice to be cooked.

Fried Rice may be considered one of those basic dishes which any Chinese home-cook can make.  When I first started cooking, I was arrogant enough to believe that I’d be able to make fried rice quite easily. But it took me a couple of attempts before I got it the way I wanted – with the rice grains “loose” instead of mushy or clumping together, and the egg adhering to the rice grains and remaining somewhat fluffy.  A lot of it boils down to practice.  The more comfortable you are with cooking with a wok, the easier it becomes.

I’m sure many of you would have your own recipes for fried rice.  But a friend recently asked that I share some simple, basic, recipes which didn’t involve too much work.  So here it is, specially with L in mind:

Ingredients

1.5 cups cooked white rice, cooled
3 tbs chopped garlic
1/2 brown onion, chopped (optional)
4 shallots, sliced
A thumb of ginger, peeled and sliced
1/2 carrot, diced
4 tbs peas
3 eggs, beaten (add a little soya sauce and pepper if you wish)
10 medium prawns, shelled and de-veined
Lean pork, cut into strips, and seasoned with light soya sauce and pepper, OR  some Chinese sausage, soaked, skinned and diced (Optional)
Cooking oil
Salt, soya sauce and pepper to taste

Method

In a wok, heat about 4 tbs oil, then fry garlic, ginger, shallots and onion till fragrant.  In order not to brown or burn any of it (esp the garlic), adjust the heat down as may be necessary.
Add pork and fry till browned, then add prawns, and vegetables and stir fry everything until cooked.  Remove from wok and set aside (the wok should be dry).
Fry cooked rice in the same wok, tossing and pressing the rice grains against the wok to separate them, until all the rice grains have come loose from one another.
Return the rest of the cooked ingredients into the wok and toss together with the rice until well-combined.  If there is liquid in the cooked ingredients, don’t add it to the rice all at once, as it could become too wet and mushy. Instead, add none at first, then a little at a time until desired “wetness”.  (Sometimes I don’t add any of it, especially if using a lot of brown onion which tends to produce a lot of moisture).  Once the rice and other ingredients are well-combined, add soya sauce, salt and pepper to taste.
Now push the fried rice to one half of the wok, so that the other half of the wok is empty.
Add the eggs into the empty half of the wok, and leave for awhile to cook without stirring (as if frying an omelette) until the underside is just beginning to cook (it should no longer be liquid). Adjust the heat down if necessary so the egg does not brown. It should still be soft. Once the underside is cooked (and the upper part is still somewhat liquid), toss the rice over it and leave it for a moment so the liquid part of the egg has time to adhere to the rice as it cooks and solidifies.  Once that happens, toss the rice in the wok and spread it out and turn it over in sections with the spatula if necessary, so that the parts with the egg come into contact with the wok, to enable all the bits of egg to cook.  Avoid stirring too much when the egg is still in liquid form. Once all the egg is cooked, adjust seasoning if necessary.

Your Fried Rice is now ready to be enjoyed.

Serves approximately 5.

Share this:

  • Facebook
  • Twitter
  • More
  • Tumblr
  • Pinterest
  • LinkedIn
  • Reddit
  • Email

Like this:

Like Loading...

Chinese Roast Duck Again

06 Thursday Sep 2012

Posted by sue-ann in Chinese Roast Duck, duck, recipes

≈ Leave a comment

Tags

Chinese, roast duck


So I’m back.  It seems that for the past couple of weeks, there’s always been something more compelling to do than cook.  Or maybe it has to do with the impending departure of W, who’s been my very dependable sous chef for the last 5 years.  Knowing I’d have to spend a lot more time in the kitchen after she leaves (in training someone new to take her place) may have caused me to subconsciously make other things a priority for now.

Anyway, today I got up and decided that for dinner, we’d have home-cooked Roast Duck, Broccoli with Conpoy Sauce and steamed white rice.

I decided to tweak the Chinese Roast Duck recipe which had been on the very first post on this blog. The objective was to improve on flavour (ie. make it more to my personal taste), lock in more moisture and shorten cooking time. Glad to report that it was met on all 3 counts.  Ingredients were the same, except that for the glaze, I reduced the vinegar to 1/8 cup and the honey to 2 tbs; and added hua teow chew.  Method of cooking was changed.  Here’s the recipe:

Ingredients

As for Chinese Roast Duck recipe, but for glaze, reduce vinegar to 1/8 cup,  reduce honey to 2 tbs, and add 1 tbs hua teow chew (Chinese rice wine) (You may omit this if you don’t have it).  Additional ingredient: 1 tbs butter for brushing on skin towards the end of roasting.

Method

“Butterfly” duck by removing backbone and spreading it out.  You may wish to break part of the breastbone, to get the duck to spread out better.
Pat dry duck with paper towels and rub dry marinade all over and under skin, as well as on the underside.
Place aromatics on a baking tray, place duck on top with skin side up, covering the aromatics.  Pat the duck skin dry with paper towels.
Place baking tray in oven preheated to 220C in middle rack.  Place another tray in lower rack with 1-2 inches depth of water.
Roast duck for 15 minutes at 220C.
Meantime, put glaze ingredients in small saucepan and bring to boil then remove from heat.
After 15 mins of roasting, brush on glaze.
Return to oven to roast at 200C for 20 minutes, then glaze again.
Reduce temperature to 150C and continue roasting for 35 mins.
Remove from oven and brush some butter over the skin.  You may also baste with the fat which has rendered from the duck which is now in the baking tray. Now turn up temperature to 220C and roast for 15 minutes more to get skin crackly.
Remove from oven and allow to stand for at least 15 minutes before chopping it up and serving.

Enjoy!

Share this:

  • Facebook
  • Twitter
  • More
  • Tumblr
  • Pinterest
  • LinkedIn
  • Reddit
  • Email

Like this:

Like Loading...

Seafood Paella and feeling thankful

05 Sunday Aug 2012

Posted by sue-ann in recipes, Uncategorized

≈ 3 Comments

Tags

paella, seafood


We just celebrated our 12th Wedding Anniversary last weekend.  It amazes many people, but the H and I have actually been together for 22 years. Definitely something to give thanks for.  But of course I was practically a child bride.

We were having a quiet dinner out without the kids.  I had just popped a most luscious piece of otoro sushi into my mouth when the kids called in a panic to say the neighbour’s house was on fire.  So while they were being evacuated by firemen, we thanked our sushi chef and explained that we had to go.  Thank God everyone was safe and the fire was contained.  I didn’t get to taste much of that otoro, but a most memorable dinner date it turned out to be.

Anyway, the H loves paella, so yesterday I decided to give it a go. Call me old fashioned, but I like the idea of cooking for my man.  Actually, that’s what started me cooking in the first place.  But that’s another story for another time.

Now, I decided on Seafood Paella, so off I went in the afternoon to pick up some mussels, squid and tiger prawns.  And while I was at the supermarket, I decided to throw in some chorizo as well.  I couldn’t find any paella rice, so I just got some medium-grain rice.

The rice took a lot longer to cook than I’d expected.  In fact, halfway through, I actually wondered if it would ever get cooked.  But the family survived the wait, it turned out pretty good and people were happy.  Kind of scraping the bottom of the pan at the end of it.  Not bad for a first try at all. So although I’d been a little moody all day because I missed my Saturday morning run, it made me feel a little better.

Here’s my recipe, which I hope you’ll like.  I didn’t use any chilli or anything spicy (other than the chorizo).

Ingredients

2 cups paella rice or medium-grain rice
6 tbs Olive Oil
2 whole garlic, chopped
1 brown onion, chopped
2 red bell peppers, sliced
1 or 2 tomatoes, diced
2 cups prawn stock
2 cups chicken stock plus more to add as necessary
1 or 2 spicy chorizo
A dozen mussels, cleaned and de-bearded
8-10 tiger prawns, shells on
2 large squid, sliced into rings
1 tsp saffron threads, soaked in a little water

Method

Heat olive oil in pan.  Remove skins from chorizo, and break up into balls  then  cook over medium-high heat. (Alternatively, you could just saute them till half-cooked, slice them with skin on, then return to pan to cook till nicely browned). Remove from pan.
Saute squid till just cooked and remove from pan.
Saute garlic, onion and tomatoes until softened and add the saffron with the soaking water.  Continue to cook until all the veggies are mushy.
Add 2 cups prawn stock and 2 cups chicken stock, bring to boil, season with salt and pepper, then add the rice and simmer till cooked.  Add stock if it turns dry before the rice is cooked.  (I covered the pan only after half an hour, so it took more than an hour for the rice to cook).
When rice is almost cooked, arrange the squid, prawns and bell peppers on top of the rice, and cover.  (I actually roasted the bell peppers beforehand, and tossed it in after the rice was cooked – you could do this if you don’t mind having to roast them).
In a separate pot, steam the mussels till they open (discard those which don’t).
Once everything in the pan is cooked (I had to turn the prawns over once), place the mussels on top of it, and serve.

Serves 4.

Share this:

  • Facebook
  • Twitter
  • More
  • Tumblr
  • Pinterest
  • LinkedIn
  • Reddit
  • Email

Like this:

Like Loading...

Seafood Spaghetti in Prawn Stock

19 Thursday Jul 2012

Posted by sue-ann in pasta, recipes

≈ Leave a comment

Tags

pasta, prawn stock, seafood spaghetti

You know, the amount of time I spend in the kitchen is inversely-proportionate to the amount of time I spend exercising.  There are only so many hours in a day after all.  So if there’s been a spate of relentless cooking or baking, it is safe to assume that I haven’t been exercising much (and shall soon be facing the natural consequence of eating more and exercising less).  But if I haven’t been cooking much, it doesn’t necessarily mean I’ve been exercising more.  It just means I haven’t been cooking much.

Lately, I’ve actually been trying to eat a little healthier, so my kitchen has been seeing a lot more fresh and steamed veggies, fish and chicken breast.  Not too exciting.  And I’ve been craving local hawker fare for some reason.

Anyway, this was dinner last night.  We’ve been cooking dinner for my in-laws the past couple of weeks since my mother-in-law recently had surgery done on her right shoulder.  My father-in-law is a big fan of spaghetti.  So I made this seafood spaghetti yesterday with him in mind.

This is good stuff.  But make the prawn stock. You won’t regret it.  It makes all the difference.

Ingredients

500g spaghetti
25 medium-sized fresh prawns
Approximately 400g salmon fillet, skin removed and cubed
2 medium-sized squid, skin and ink removed, sliced into rings
2 whole garlic, chopped
Fresh Italian parsley, chopped roughly
Olive oil
5 chilli padi (bird’s eye chilli), seeds removed, sliced into thin rings
Salt and black pepper

Method

Poach prawns in water with shells on, till cooked.  Remove from water and shell them.  Set aside heads and shells.  Slit backs of prawns and de-vein. Set aside.

Return prawn heads and shells to the poaching water, bring to boil and simmer for about 30 minutes to make prawn stock.  Strain stock. Set aside.

Cook spaghetti in a big pot of water, with 2 tsp salt added, on high heat so it’s bubbling, until it’s almost cooked but not cooked through, and then drain.

In a skillet, heat enough olive oil to coat the entire surface of the pan at medium-high heat.  Pat salmon dry and toss in some salt to season.  Place salmon cubes into skillet to cook one side at a time till browned on the outside and cooked through. Do not overcook.  We want it done medium, not well-done. Remove from skillet with a slotted spoon.  Set aside.

Put squid rings in the same skillet, saute quickly till just cooked, and remove with slotted spoon. Set aside.

In same skillet, saute chopped garlic till cooked, then put in the chilli and saute for a couple of minutes.  Put in the prawns and turn them over when they just start to curl on the first side, and then allow them to curl on the other side as well before adding about 4 ladles’ worth of prawn stock.  Return squid and salmon to the skillet.  Be gentle with the salmon – try not to let them flake or break up.  Allow everything to simmer in the stock for couple of minutes and then season with salt.

Add the spaghetti to the skillet and mix well, then allow to simmer in the stock for a bit.  Add more stock if it is too dry (there should be some liquid at the bottom of the skillet). Toss once or twice while simmering. Once spaghetti is cooked, add salt and black pepper to taste.

Serve sprinkled with chopped Italian parsley.

Serves 6.

Share this:

  • Facebook
  • Twitter
  • More
  • Tumblr
  • Pinterest
  • LinkedIn
  • Reddit
  • Email

Like this:

Like Loading...

Pasta Frittata: Breakfast at home on a Sunday

08 Sunday Jul 2012

Posted by sue-ann in eggs, recipes

≈ Leave a comment

Tags

breakfast, eggs, frittata, leftover pasta


I remember coming across a recipe for spaghetti frittata some years back,  and thinking it was a great idea for leftover pasta.  But somehow it was only this morning that I tried making it.

We had some leftover penne pasta tossed in a vegetarian tomato-based sauce from last night’s dinner, and so while my brood were crawling out of bed this morning, I crept downstairs, turned on the oven to preheat at 180C, then whisked 5 eggs with 75g of grated parmigiana, and mixed in the leftover pasta (just under 300g).  Then the mixture was poured into an oiled baking pan, which was popped into the oven to bake at 200C until cooked and a golden crust had formed.  Took about 25 minutes.  And that was all it took for a yummy, savoury breakfast, which felt a lot more like brunch.

Honestly, I’d make this again if only to inhale that mouth-watering aroma which wafted in my kitchen as it baked.

Share this:

  • Facebook
  • Twitter
  • More
  • Tumblr
  • Pinterest
  • LinkedIn
  • Reddit
  • Email

Like this:

Like Loading...

Home-made Roti John

29 Tuesday May 2012

Posted by sue-ann in eggs, recipes, roti john

≈ 2 Comments

Tags

eggs, recipes, roti john


It’s the school holidays again and I’m loving it!   Apart from the kids being able to sleep in and take their time with breakfast, and me not having to worry about ensuring they have every morning a clean set of school uniform, clean shoes, school snacks, homework and getting them to school when the sun is barely up, I like that they have the time to just hang out together, relax and play.

We try not to schedule too much for our kids (none of those enrichment classes – just piano and sport), but even then, they don’t get as much playtime as we used to when we were kids, what with schoolwork, tuition and their other activities during term time.  Sad. So I love the school holidays. I usually try to take time off work to be with them at home.  Sometimes I think I might love it more than they do!

Anyway, one of my favourite moments in life is when the kids are sitting at the kitchen island while I make breakfast. This morning, I thought it was time that we finished up that half a baguette which nobody seemed interested in eating.  So I decided to transform it into something a little more exciting: Home-made Roti John.  We ate it with some Maggi chilli sauce and it was good! Half a loaf of baguette gone in under 10 minutes.

Ingredients

Olive oil
1/2 a brown onion, cut into rings
2 tsp chopped spring onion
2 eggs, beaten
1/2 tsp soya sauce (add to eggs)
1/2 tsp sugar (add to the eggs)
Half a loaf of baguette, sliced across and halved (so you get 4 pieces)

Method

Heat about 2 tbs olive oil in a frying pan, and saute some onion till softened (I like them charred slightly at the edges).
Add spring onions, and saute for half a minute, then add eggs to pan.
Place baguette pieces face down onto the eggs and allow the eggs to cook.
When eggs are cooked, cut through the egg between the pieces of baguette with a spatula (so that you may turn them over individually).
Drizzle some olive oil over the crust of the baguette, then turn them over, to get the crust crispy.
Once the crust is crispy, remove, place face up on a plate, sprinkle some spring onions and black pepper over it, and serve with chilli sauce.

Share this:

  • Facebook
  • Twitter
  • More
  • Tumblr
  • Pinterest
  • LinkedIn
  • Reddit
  • Email

Like this:

Like Loading...
← Older posts

Enter your email address to follow this blog and receive notifications of new posts by email.

Join 17 other subscribers

Visit my facebook page for more pictures from my kitchen

Visit my facebook page for more pictures from my kitchen

Recent Posts

  • Super-moist Nutella and Chocolate Banana Bread
  • Char Kway Teow: Another Experiment in Hawker Fare
  • Lamb Chops rubbed with mint and spices
  • Black Pepper Garlic Striploin Roast, and hello!
  • Deliciously Easy Yet Healthy: Chicken Casserole with Chopped Vegetables

1000 Hits and Counting apple Apple Pie bakes beef Carrot Walnut Cake celebrations Chai Latte Char Siew Chatting Up Your Fruiterer chicken Chicken Rice chicken wings Chicken Wings with 1/2 the Guilt chinese Chinese home-style cooking Chinese Roast Duck drink duck eggs family fish Fish Mee Sua Soup french fries fried rice fruit hawker fare Hearty Chicken and Vegetable Soup Japanese kids Lemongrass and Ginger Iced Tea life Lovesick for Ipoh Hor Fun Nonya Laksa notes and messages one-dish meals pasta Pepper Grilled-Steak with Chopped Summer Salad pie pineapple Pineapple Fried Rice pork Pork Chops potatoes quick and easy recipe recipes roasts Roast Turkey roti john running salad salmon shortcrust pastry sides soup steak Steak and Salmon on a Whim Tau Yew Bak Thai Tiger Prawn Sun-Dried Tomato Pasta travel turkey Uncategorized Vermont Curry

COPYRIGHT 2012

Blog at WordPress.com.

Privacy & Cookies: This site uses cookies. By continuing to use this website, you agree to their use.
To find out more, including how to control cookies, see here: Cookie Policy
  • Follow Following
    • lifeisdelish
    • Already have a WordPress.com account? Log in now.
    • lifeisdelish
    • Customize
    • Follow Following
    • Sign up
    • Log in
    • Report this content
    • View site in Reader
    • Manage subscriptions
    • Collapse this bar
 

Loading Comments...
 

    %d bloggers like this: